
It is the absolute peak of summer in 2026. The extreme heat outside is relentlessly beating down on your roof, and the humidity makes the air feel thick enough to cut with a knife. You finally seek refuge inside your home, grab the remote, and turn your thermostat down to a comfortable, icy temperature. You hear the familiar, comforting hum of the compressor kicking on. Relief washes over you. But an hour later, as you walk down the hallway, your foot lands in a cold, squishy puddle. Panic sets in. You look up, and to your horror, your air conditioning vent is actively dripping water onto your expensive hardwood floors.
If you are frantically searching the internet, wondering what went wrong, let us directly answer your most pressing question: No, air conditioners aren’t supposed to leak water excessively inside your home, but a certain amount of condensation is entirely normal.
However, before you assume the worst and prepare for a massive replacement bill, take a deep breath. Did you know that nearly 70% of all AC leaks are caused by a clogged condensate drain? That means the majority of these terrifying indoor puddles can be fixed with a little bit of DIY know-how and some basic household tools.
| Aspect | Details | Fixes & Prevention |
|---|---|---|
| Normal Operation | Minimal external drip from outdoor unit during dehumidification; indoor unit has no visible leaks. | Regular maintenance clears drains; use tablets to prevent algae. |
| Leak Causes | Clogged drain line (dirt/algae #1 cause); dirty filter; frozen evaporator coils (low refrigerant/airflow). | Clean/replace filter; wet vac drain line; call pro for refrigerant. |
| Leak Locations | Indoor unit pan overflow; floor puddle under unit. | Shut off AC; mop up; inspect pan for cracks. |
| When It’s Urgent | Persistent leaks risk mold/water damage; frozen coils shut down cooling. | Pro HVAC service within 24 hrs in humid climates like Florida. |
| Florida Tips | High humidity worsens clogs; low outdoor temps (<60°F) freeze coils. | Annual tune-ups; insulate lines; avoid running in cool evenings. |
The Science Behind the Sweat: Why ACs Produce Water
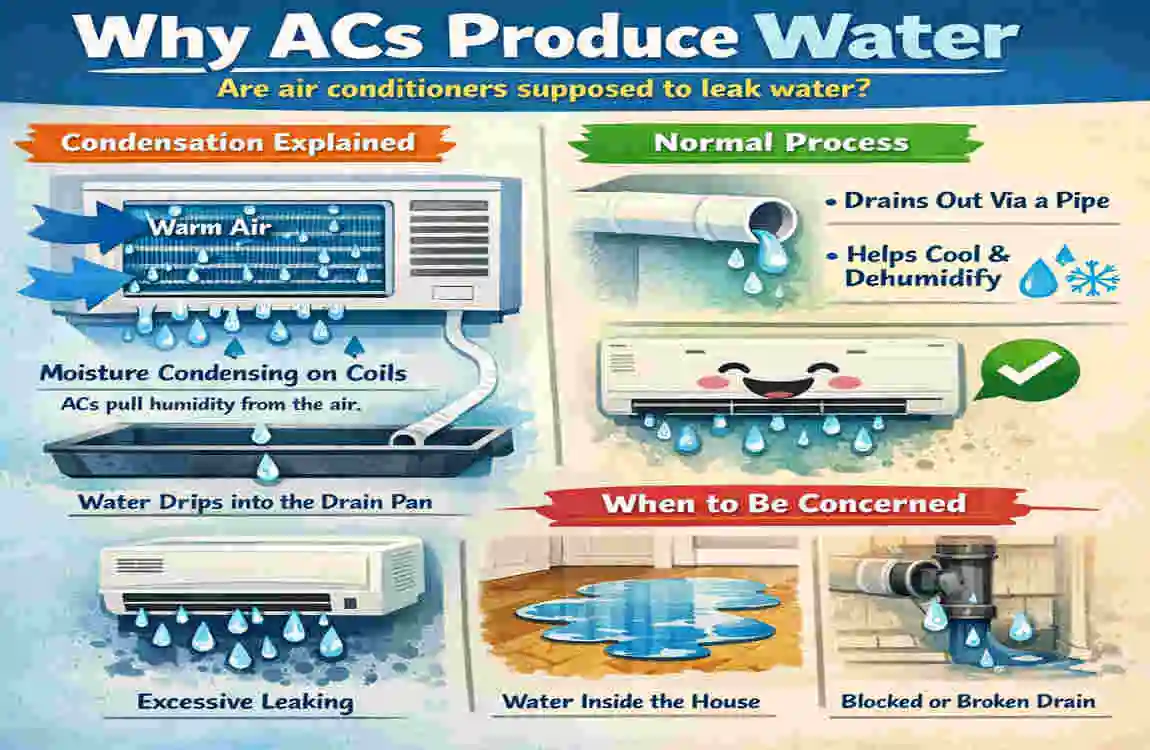
To understand why your air conditioner is leaking, we first need to understand why it produces water in the first place. Many homeowners assume that an AC unit pumps cold air into a room, but the reality is a bit more complex. Your air conditioner is actually a massive dehumidifier.
Think about what happens when you take an ice-cold drink out of the refrigerator and set it on your kitchen counter on a hot, humid afternoon. Within minutes, the glass’s exterior begins to “sweat.” Water droplets form and eventually trickle down, creating a puddle on your counter. This happens because the cold glass surface lowers the temperature of the surrounding air to its dew point, causing the invisible moisture in the air to condense into liquid water.
Your air conditioner operates on this same principle. Inside your indoor unit, there is a component called the evaporator coil. This coil is filled with cold chemical refrigerant. As warm, humid air from your house is blown over this freezing coil, it cools rapidly. Just as your glass of iced tea condenses moisture on the outside, the moisture in your indoor air condenses on the coils.
So, where does all this water go? Under normal operation, these water droplets drip from the evaporator coil and fall into a specialized tray below, known as the drain pan. From the drain pan, the water flows into a PVC pipe called the condensate drain line, which safely carries it outside your home.
In highly humid areas, a standard central air conditioning system can produce up to 20 gallons of water per day! It is completely normal to see a steady drip of water coming from the white PVC pipe on the outside of your house. However, when that water starts showing up inside your house, it signals a major disruption in this drainage system. Poor drainage immediately threatens your home’s infrastructure, putting your drywall, ceilings, and flooring at severe risk.
Common Causes of AC Leaks in Your Home
When water starts backing up into your living room, there is a specific roadblock interrupting the normal flow of condensation. Let’s break down the top seven reasons your AC might be crying tears of frustration.
Clogged Condensate Drain Line
As we mentioned earlier, this is the undisputed heavyweight champion of AC leaks, accounting for roughly 50% of all cases. Because your condensate drain line is constantly dark, damp, and filled with moisture, it creates the absolute perfect breeding ground for algae, mold, mildew, and fungi. Over time, this biological buildup combines with household dust to create a thick, slimy sludge that completely blocks the narrow PVC pipe.
-
- Common Symptoms: Water overflowing from the indoor drain pan.
- Your AC randomly shuts off (many modern units have a float switch that cuts power when the pan fills, preventing flooding).
- A musty, swampy smell is coming from your air vents.
Dirty Air Filters
It might sound unrelated, but a dirty air filter is one of the quickest ways to cause an indoor flood. Your AC requires a steady, unhindered flow of warm air over the evaporator coils to keep them from getting too cold. When you forget to change your air filter, it becomes clogged with pet hair, dust, and dander. This chokes the system, restricting airflow. Without warm air to balance the temperature, the freezing refrigerant causes the condensation on the coils to turn into a solid block of ice. When the system eventually turns off, that massive ice block melts rapidly, overwhelming the drain pan and spilling onto your floor.
-
- Common Symptoms: Weak airflow coming from your vents.
- The AC runs constantly, but the house never feels cool.
- Visible ice on the indoor unit or the outdoor refrigerant lines.
Low Refrigerant Levels
Refrigerant (often referred to by the brand name Freon) is the lifeblood of your cooling system. Your AC does not “consume” refrigerant; it circulates it in a closed loop. If your system is low on refrigerant, it means you have a chemical leak somewhere in the lines. Counterintuitively, low refrigerant pressure causes the evaporator coil pressure to drop, resulting in the temperature plummeting below freezing. Just like a dirty filter, this can lead to a frozen coil that eventually melts and floods your home.
-
- Common Symptoms: A faint hissing or bubbling sound coming from the AC unit.
- The air coming out of your vents feels lukewarm.
- Unusually high energy bills.
Frozen Evaporator Coils
While dirty filters and low refrigerant are the primary culprits, frozen evaporator coils deserve their own mention because they are the direct physical cause of the massive water dump. Anything that blocks airflow—such as crushed ductwork, closed vent registers in multiple rooms, or a failing blower motor—can cause the coils to ice over.
-
- Common Symptoms: You can see a thick layer of frost or solid ice when you open the indoor unit access panel.
- The system struggles to reach the temperature set on the thermostat.
Broken Condensate Pump
Not all homes rely on gravity to drain AC water. If your indoor unit is located in a basement, an underground crawlspace, or a high attic, the water cannot naturally flow downward to the outside. In these cases, installers use a small, motorized condensate pump to push the water upward and out of the house actively. If this pump burns out, loses power, or gets jammed with debris, the water has nowhere to go but all over your floor.
-
- Common Symptoms: The drain pan is full and overflowing.
- The small pump box next to your AC is either dead silent when the pan is full or making a loud, grinding mechanical noise.
Improper Installation
If you recently installed a brand-new AC unit and it is already leaking, poor installation is likely to blame. The drain pan beneath the evaporator coil must be angled slightly toward the drain pipe to allow gravity to do its job. If the unit was installed perfectly level—or worse, tilted backward—the water will pool at the wrong end of the pan and spill over the edge. Additionally, if the contractor installed an oversized unit for your home’s square footage, the AC will “short cycle” (turn on and off too quickly), failing to dehumidify the air properly and causing erratic condensation.
-
- Common Symptoms: Water pooling under a specific corner of the unit, opposite the drain line.
- The system turns on for only five minutes at a time.
Extremely High Humidity
Sometimes, your AC is working perfectly fine, but the environment is too hostile. In notoriously muggy climates—think of the sweltering heat of Lahore summers or August in Florida—the air is so saturated with moisture that your system becomes overwhelmed. The AC extracts water faster than the standard drainpipe can carry it away.
-
- Common Symptoms: Constant, heavy dripping even when the drain line is clear.
- Your home still feels sticky and clammy, even with the AC running.
The Hidden Dangers of Ignoring AC Leaks
You might be tempted to throw a thick towel under the dripping vent and ignore the problem until the weekend. We strongly advise against this. Ignoring an AC leak is like ignoring a ticking time bomb in your house. The dangers escalate rapidly, impacting your wallet, your home’s structural integrity, and even your family’s health.
First, consider the water damage. Drywall acts like a sponge. If an attic AC unit overflows, the water will soak through your ceiling, creating massive, unsightly brown stains before eventually causing the ceiling to collapse under the weight. If the unit is in a closet, water will warp your expensive hardwood floorboards, soak into your carpets, and rot the wooden framing of your house.
Next, we need to discuss the terrifying reality of mold growth. In a dark, warm, and wet environment, toxic black mold can begin to grow in as little as 48 hours. Once mold takes root in your carpets or behind your drywall, it releases millions of microscopic spores into your indoor air. This leads to severe health impacts, particularly for children, the elderly, or anyone in your family who has asthma or respiratory allergies. You might find your family constantly dealing with unexplained coughs, sneezing, and watery eyes.
There are also severe electrical hazards. Your air conditioning system requires a massive amount of electricity to run. Water and high-voltage electricity are a deadly combination. An overflowing pan can easily drip onto exposed wiring, circuit boards, or the blower motor, causing electrical shorts, permanent component damage, or even sparking a house fire.
Finally, ignoring the problem destroys your system’s efficiency. A struggling AC unit will run twice as long to cool your home, resulting in a sudden 20% to 30% energy hike on your monthly utility bill. Worse yet, pushing a malfunctioning system to its limits will inevitably lead to a full system breakdown. Replacing a fried compressor or a rusted-out indoor unit can easily cost you $5,000 or more. Fixing a leak immediately is the ultimate form of financial protection.
Step-by-Step DIY Fixes for a Leaking AC
If you have discovered a puddle, don’t panic. Many of the most common causes can be fixed right now, by you, using items you already have in your garage or kitchen. Here is your actionable, step-by-step DIY guide to getting your AC back in working order.
CRITICAL SAFETY WARNING: Before you touch any part of your HVAC system, you must turn off the power. Go to your home’s main electrical panel and flip the breaker switch for your AC to the “OFF” position.
Clear a Clogged Condensate Drain
This is the most common fix and usually resolves the issue within 30 minutes.
- Locate the Drain Line: Find the white PVC pipe near your indoor AC unit. You should see a small, vertical piece of pipe with a removable cap—this is your access point.
- Vacuum the Line: Go outside to where the pipe drains into your yard. Take a wet/dry shop vacuum, place the hose over the end of the PVC pipe, and wrap a wet rag around the connection to create a tight, airtight seal. Turn the vacuum on for 3 minutes. You will likely hear a satisfying “thwack” as the vacuum sucks out the algae plug.
- The Vinegar Flush: Go back inside to the access pipe. Remove the cap and pour exactly one cup of distilled white vinegar down the pipe. Let it sit for 30 minutes. The vinegar’s high acidity will kill any remaining algae and loosen stubborn sludge.
- Rinse: Follow the vinegar with a slow pour of warm water to flush the system clean.
Replace a Dirty Air Filter
If your coils are frozen due to poor airflow, this is your immediate solution.
- Locate the Return Vent: Find the large metal grille on your wall or ceiling where the air is sucked into the system.
- Remove the Old Filter: Unlatch the grille and pull out the old filter. Hold it up to a light bulb. If you cannot see light shining through the material, it is completely clogged.
- Install the New Filter: Take your new, correctly sized filter. Look at the cardboard frame for the small arrow indicating “Airflow.” Ensure the arrow points toward the AC unit (away from the room). Slide it in and close the grille.
Defrost Frozen Evaporator Coils
If you opened your unit and saw a massive block of ice, you cannot run the system until it thaws.
- Change the Thermostat: Turn your thermostat setting from “Cool” to “Off.” Then, change the fan setting from “Auto” to “On.” This forces the system to blow warm room air over the ice block without running the cooling compressor.
- Prepare for the Melt: Lay thick towels down around the base of the indoor unit. As the ice melts, it may overwhelm the drain pan again, and you want to protect your floors.
- Wait it Out: Do not try to chip the ice away with a tool! The evaporator coils are incredibly delicate, and puncturing one will release toxic refrigerant and ruin the unit. Let the fan melt the ice naturally over 1 to 2 hours.
Inspect the Condensate Pump
If you have a basement or attic unit, check the small pump box.
- Unplug It: Disconnect the pump from the wall outlet.
- Clean the Reservoir: Remove the pump’s top. You will likely find a small reservoir filled with murky water and slime. Empty the water into a bucket and wipe the reservoir clean with a soapy rag.
- Check the Float: Inside the pump, there is a small plastic float (like the one in a toilet tank). Make sure it can move up and down freely. If it is jammed, the pump won’t know when to turn on.
Check Refrigerant (Visual Only)
We must be clear: You cannot DIY a refrigerant recharge. Handling Freon requires an EPA certification and specialized gauges. However, you can visually inspect for a leak.
- Look for Stains: Inspect the copper pipes running to your indoor unit. Do you see any greasy, oily stains? Refrigerant leaks often leave an oily residue behind.
- Listen: Put your ear near the coils. Do you hear a faint hissing sound? If you spot these signs, turn the system off and call a professional immediately.
Quick Reference: DIY Fixes
FixTools Needed Time Required Estimated Cost
Drain Clear White Vinegar, Wet/Dry Vacuum, Rag 20 – 30 mins ~$5.00
Filter Swap New properly sized Air Filter 5 mins $15 – $25
Coil Defrost Towels, Patience 1 – 2 hours $0
Pump Clean Bucket, Dish Soap, Rag 15 mins $0
By attempting these simple DIY fixes, you can easily save yourself $150 to $300 on an emergency service call!
Long-Term Prevention Tips for Your Home
The best offense is a good defense. You do not want to wait until water ruins your baseboards before taking action. By implementing a few simple, long-term strategies, you can keep your AC running dry, clean, and efficiently all year long.
- Implement Monthly Filter Changes: Do not rely on your memory. Set a recurring alarm on your smartphone for the 1st of every month to check your filter. If you have multiple pets, live in a dusty area, or suffer from allergies, you absolutely must change the filter every 30 days. Clean airflow is the secret to a healthy AC.
- Schedule Annual Pro Tune-Ups: Treat your AC like your car. It needs an oil change and an inspection. Hire a certified HVAC technician every spring before the heavy summer heat arrives. They will clear the drain lines, check the electrical connections, and top off the refrigerant if necessary.
- Insulate Your Drain Lines: If your AC is located in a hot, unconditioned space like an attic or garage, the temperature difference between the cold water inside the PVC pipe and the hot air outside can cause the pipe itself to sweat. Wrap your exposed condensate lines in cheap foam pipe insulation to prevent external dripping.
- Install UV Lights: If you are constantly battling algae clogs in your drain line, consider having a UV light installed near the evaporator coil. Ultraviolet radiation zaps and kills mold, bacteria, and algae spores before they can enter the drain pan, keeping your system clinically clean.
- Size Your AC Correctly: If you are in the market for a new home or a new unit, ensure your HVAC contractor performs a “Manual J load calculation.” Buying a unit that is too large for your home’s square footage means it will cool the house too fast and shut off before it has a chance to dehumidify the air, leading to a clammy house and excessive condensation.
Your Seasonal Homeowner Checklist:
- Spring: Book a professional tune-up; clear brush away from the outdoor unit.
- Summer: Change filters monthly; pour 1 cup of vinegar down the drain line every 90 days.
- Fall: Check window seals; monitor for strange operational noises.
- Winter: Cover the outdoor unit if you live in a snowy climate; switch the thermostat to heat Mode.
By following these prevention tips, you aren’t just stopping leaks—you are actively optimizing your system, which translates to massive energy savings on your monthly utility bills.
When to Wave the White Flag: Calling a Professional
While we love empowering homeowners to tackle DIY projects, an HVAC system is a complex, high-voltage piece of machinery. Sometimes, you have to pass the baton to the experts. Knowing when to call a professional can save you from accidentally causing thousands of dollars in further damage.
Watch out for these absolute Red Flags:
- Persistent Leaks: You cleared the drain line, changed the filter, and defrosted the coils, but the water keeps coming back. This indicates a deeper structural issue.
- Strange Noises: If your indoor unit is screeching, grinding, or aggressively vibrating, shut it off immediately. You likely have a failing blower motor.
- No Cooling: If the AC is running but blowing warm air, and the filter is clean, you almost certainly have a refrigerant leak.
Professionals have the specialized tools to diagnose refrigerant leaks, test electrical capacitors, and handle toxic chemicals safely. The average cost for a professional diagnostic visit and minor repair ranges between $100 and $400.
Frequently Asked Questions (FAQs)
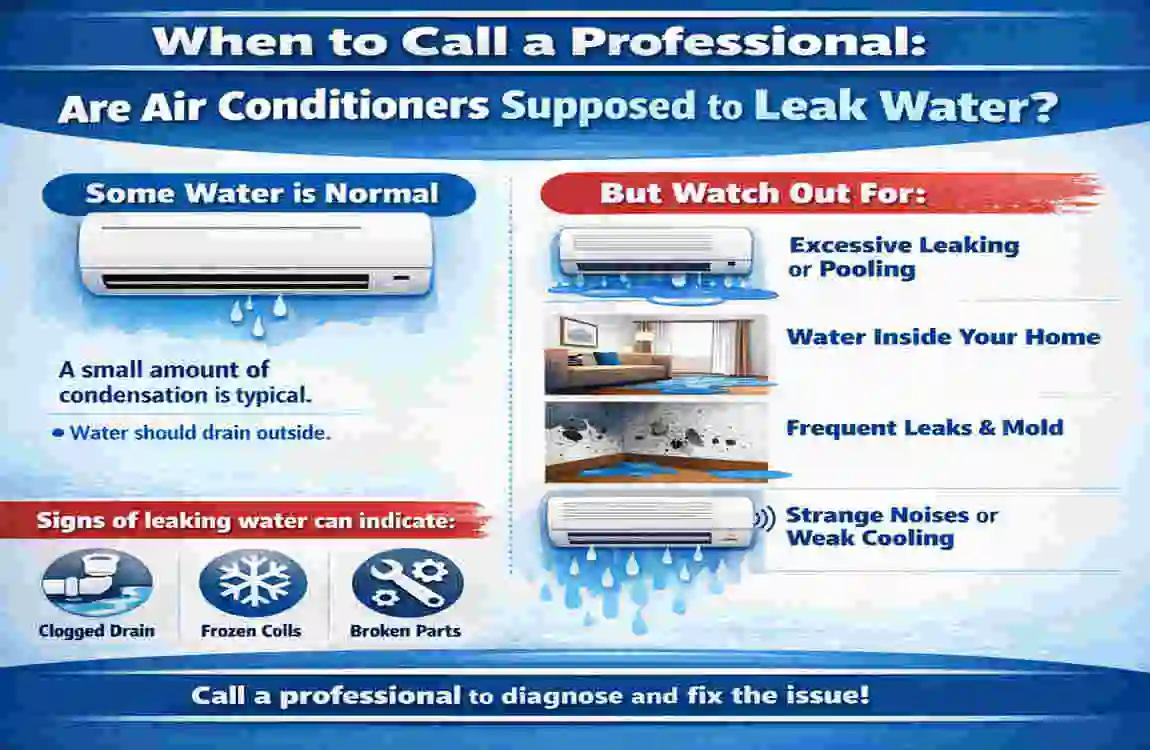
Is a little water normal for an AC unit? Yes, a little condensation dripping from the outside PVC exhaust pipe is completely normal as the system pulls humidity out of your home. However, water dripping inside your house is never normal.
How much leak is too much? If water is actively pooling around the indoor base of your unit, dripping from your ceiling, or soaking your carpets, the leak is severe. You should turn off the system immediately to prevent water damage.
Can a leaking AC cause a fire? Yes, it is possible. If an overflowing drain pan drips water directly onto exposed electrical wires, circuit boards, or the blower motor, it can cause a severe electrical short and potentially spark a fire.
Why is my AC dripping water inside? The most common reasons your AC is dripping water inside are a clogged condensate drain line (usually filled with algae), a dirty air filter causing the coils to freeze, or a cracked drain pan.
How often should I clean my AC drain line? You should proactively pour 1 cup of white vinegar down your AC condensate drainpipe every 3 months (90 days) during the cooling season to prevent algae buildup.
Can I run my AC while it’s leaking? No. Continuing to run a leaking AC will only produce more water, compounding the water damage to your home and potentially burning out the system’s internal components. Turn it off until the fix is applied.