
Have you ever walked into a stunning, newly renovated house and immediately stared at the floors? There is something truly magical about the rich, warm look of natural wood stretching across a room. However, if you have ever priced out traditional hardwood floors, you know that the costs can quickly shatter your renovation budget. This is exactly where Dream Home laminate flooring swoops in to save the day.
Offering incredibly realistic wood textures, fantastic water resistance, and an easy-to-use click-lock system, this flooring option gives you the luxurious look of hardwood without the terrifying price tag. But here is the real secret to maximizing your budget: doing the work yourself.
Professional contractor fees can easily eat up your renovation funds, sometimes charging up to $5 per square foot for labor alone. When you take on the project yourself, you keep that hard-earned money right in your pocket. If you are reading this, you are ready to roll up your sleeves but may feel intimidated by the process. Do not worry! If you want to learn how to install Dream Home laminate flooring, you have come to the exact right place.
| Step | Description | Tools/Materials Needed | Key Tips & Warnings |
|---|---|---|---|
| Acclimate & Prep Room | Let planks sit unopened in the room for 48 hours. Remove baseboards, doors if needed; clean and level subfloor (flat within 3/16″ over 10 ft). | Utility knife, pry bar, level, broom. Dream Home planks (buy 10% extra). | Test subfloor moisture (<5 lbs/1000 sq ft on concrete). Fill dips with compound; sand highs. |
| Doorway & Layout Prep | Undercut door jambs. Plan layout from longest wall; dry-lay first row. | Jam saw or oscillating tool, spacers (1/4-1/2″ expansion gap), tape measure, pencil. | Stagger seams 12″+; mark straight line with chalk. |
| Install Underlayment | Roll out foam or felt underlayment perpendicular to planks; overlap seams 4″; tape. Add vapor barrier on concrete. | Underlayment roll, tape/utility knife. | Trim to fit; avoid compressing under walls. |
| Lay First Row | Groove side faces wall; tongue out. Insert at 20-30° angle, tap lightly to click. Use spacers for gaps. | Tapping block, mallet, spacers, straightedge planks. | Rip last plank lengthwise if needed; ensure dead-straight start. |
| Install Subsequent Rows | Angle tongue into previous groove at 45°; lower and tap. Stagger ends; cut for fit. | Circular saw/jigsaw, tapping block, pull bar for tight fits. | Offset joints 12-18″; gently tap—avoid damaging edges. |
Tools and Materials Needed for a Flawless Finish
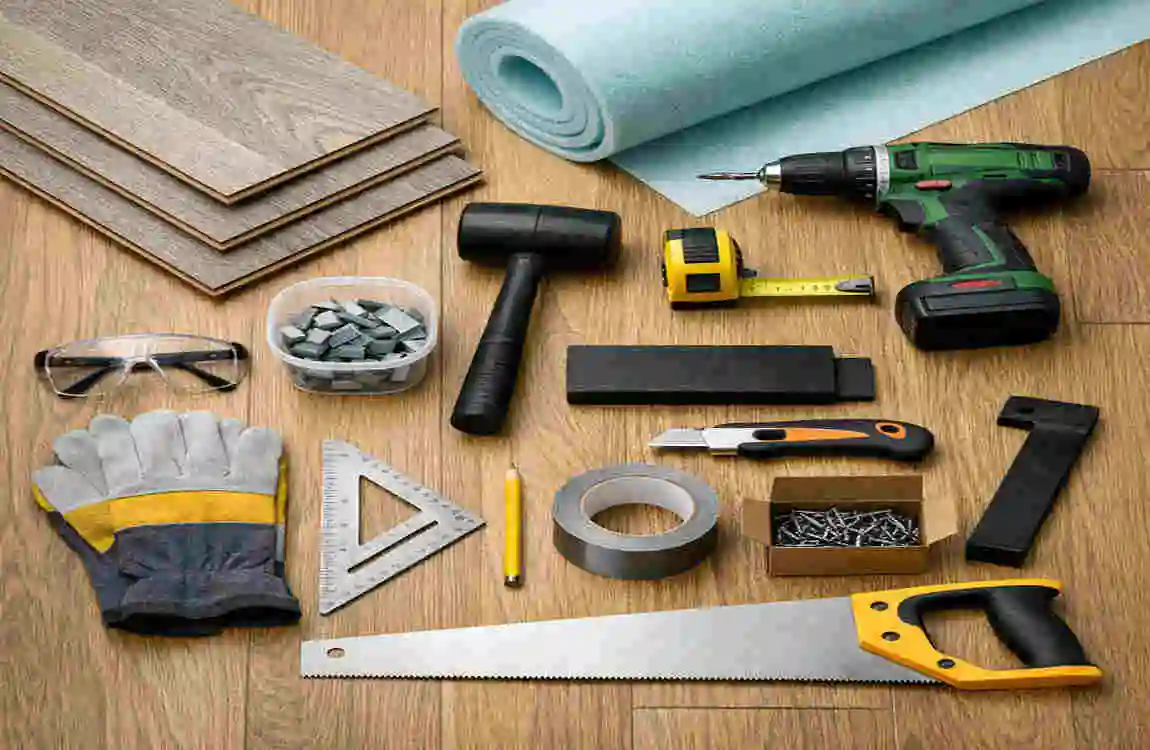
You might need a massive, professional workshop to tackle a DIY laminate flooring installation. Thankfully, that is not true. You can find everything you need at your local hardware store, and you might even have a few of these items sitting in your garage right now.
Having the right tools on hand before you start will save you from frustrating mid-project trips to the store. Here is exactly what you need to gather.
Essential Installation Tools
Category Items You Need: Why You Need Them
Cutting Tools: Circular saw, jigsaw, or utility knife. You will need to cut planks to fit the edges of your room. A jigsaw is perfect for tricky cuts around doors and pipes.
Installation Kit: Tapping block, pull bar, plastic spacers. These are non-negotiable. They ensure your planks lock together tightly without damaging the edges and keep your expansion gap perfect.
Measuring Tools: Tape measure, carpenter’s square, long level. Precise measurements and a level subfloor are the absolute secrets to preventing your floor from buckling later.
Safety Gear: Knee pads, safety glasses, dust mask, work gloves. You will spend hours on your knees. Knee pads will literally save you from days of pain. Glasses and masks protect you from sawdust.
Materials and Flooring Supplies
Beyond the tools, you need the actual materials to build your new floor.
First and foremost, you need your Dream Home laminate planks. When ordering your boxes, calculate the square footage of your room (length multiplied by width), then add an extra 10% to that total. Why? Because you will inevitably make mistakes and need to cut pieces to fit the ends of the room. This 10% “waste factor” ensures you don’t run out of flooring when you are just three feet away from the finish line!
Next, you need your underlayment. Think of underlayment as a thin, spongy mattress for your floor. If your Dream Home planks do not come with underlayment already attached to the back, you must buy rolls of it. It smooths out tiny bumps, makes the floor softer to walk on, and dampens the sound of your footsteps.
If you are installing your flooring directly over a concrete subfloor (like in a basement), you absolutely must purchase a 6-mil plastic vapor barrier. Concrete constantly emits invisible moisture, and this plastic sheet prevents it from warping your beautiful new wood-look planks.
Finally, grab some matching quarter-round molding or baseboards to cover the edges of the room when you are finished. Budget tip: Dream Home flooring is incredibly cost-effective, typically running between $2 and $4 per square foot, making it a dream for budget-conscious homeowners.
Crucial Preparation Steps: The Secret to Success
Here is a hard truth about flooring: the final result is only as good as the preparation underneath it. If you rush through this phase, your floor will squeak, bounce, and eventually break. Take your time here. Proper laminate subfloor prep is the foundation of a stunning room.
The Golden Rule: Acclimate Your Planks
Do not skip this step! When you bring your boxes of flooring home, do not start installing them immediately. Wood products naturally expand and contract with changes in air temperature and humidity.
You must let the unopened boxes of planks sit in the middle of the room where they will be installed for at least 48 hours. Keep your home’s temperature and air conditioning at normal living levels. This process, called acclimation, allows the plants to adjust to your home’s specific climate. If you skip this, the planks will expand after you install them, causing your entire floor to buckle and peak like a mountain range.
Subfloor Checks and Cleaning
The subfloor is the raw layer of wood or concrete beneath your old flooring. First, rip out all the old carpet, vinyl, or peeling laminate. Once you are down to the bare subfloor, check whether it is flat.
Take a long, level (or very straight) piece of wood and lay it across the floor. You are looking for high peaks and low valleys. The rule of thumb is that the floor must be flat within 3/16 of an inch over a 10-foot span.
- If you find a dip, fill it with a self-leveling floor compound.
- If you find a wooden bump or a high spot, sand it down.
Once the floor is perfectly flat, vacuum the entire room twice. Even a tiny pebble left on the subfloor will create an annoying clicking sound every single time you step on it. If you are dealing with concrete, perform a quick moisture test. Tape a square of clear plastic to the concrete for 24 hours. If condensation forms under the plastic, your concrete is releasing too much moisture, and you must use a heavy-duty vapor barrier.
Doorway Preparation: The Professional Touch
One of the biggest giveaways of an amateur flooring job is how the floor meets the door frames. Beginners often try to cut the planks into weird, complex shapes to fit around the door frame. Do not do this!
Instead, you want to cut the bottom of the door frame so the flooring can slide underneath it. Take a scrap piece of your laminate flooring and a piece of your underlayment. Lay them flat against the bottom of the door frame. Rest a handsaw (or a motorized jamb saw) flat on top of the scrap plank, and cut directly through the door trim. Pop out the cut piece of wood, and you will have a perfect, invisible gap for your new floor to slide into.
Plan Your Layout
Before you click a single board together, visualize the room. You always want to start laying your planks parallel to the longest wall in the room. This makes the room look larger and reduces the number of cuts you have to make.
You also want to stagger your seams. You do not want the ends of the planks to line up perfectly, like a grid on graph paper. The end joints should be staggered at least 12 inches apart from the row next to it.
Step-by-Step Installation Guide
You have gathered your tools, prepped your floor, and let your planks breathe. Now comes the fun part. Learning how to install Dream Home laminate flooring is all about getting into a comfortable rhythm. Follow these detailed steps, take your time, and watch your room transform before your eyes.
Install the Underlayment
If your Dream Home planks do not feature pre-attached padding, you must roll out your underlayment first. Start at the longest wall and roll the underlayment out perpendicular to the direction you plan to lay your floorboards.
Roll out one row at a time. If you roll out the whole room at once, you will end up slipping and sliding all over it while you work. When you need a second row of underlayment, butt the edges together. Most Premium underlayment rolls come with a sticky tape edge to seal the seams. If yours does not, use basic packing tape to seal the seams together.
If you are on concrete, this is also the exact moment you lay down your 6-mil plastic vapor barrier, overlapping the plastic seams by at least 4 inches and taping them securely to stop sneaky moisture from rising.
Lay the First Row
The first row is the anchor for your entire project. If your first row is crooked, the entire room will be crooked.
Start in the left corner of your longest wall. Grab your plastic spacers (they look like little plastic wedges) and place them against the wall. You must leave a 1/4-inch to 1/2-inch gap between the flooring and the wall. This is your “expansion gap.” Because laminate is made of wood materials, it swells in the summer and shrinks in the winter. If you push the planks tight against the wall, they will have nowhere to go when they expand, causing the floor to pop up in the middle of the room.
Place your first plank flat on the floor with the “tongue” side facing the wall and the “groove” side facing out into the room. (The tongue is the thin, protruding edge; the groove is the open slot).
To add the second plank, hold it at a slight angle, insert the short end into the short end of the first plank, and press it flat to the floor. It should lock with a satisfying click. Continue this down the entire wall. When you reach the end of the wall, you will likely need to cut the last plank to fit. Measure the space, cut the plank with your saw, and lock it into place.
Staggering Subsequent Rows
This is where the real magic of the click-lock flooring guide happens. Remember that piece you just cut off at the end of the first row? As long as it is longer than 12 inches, use that leftover piece to start your second row! This automatically creates a beautifully staggered, natural-looking seam pattern that mimics the look of real hardwood.
Take your starting piece for row two. Hold it at a 45-degree angle and push the long edge into the groove of the first row. Gently wiggle it while pushing downward until it snaps flat into place.
Now, grab your next full plank. This requires a double-locking motion. First, connect the short end to the plank you just laid down. Then lift both planks slightly at an angle and push the long side into the row above.
Sometimes, your hands aren’t quite strong enough to push the seams completely flush. This is where your tapping block comes in. Place the specialized plastic tapping block against the outer edge of the plank and tap it gently with a hammer. This forces the planks tightly together, eliminating any tiny, invisible gaps. Never hit the flooring directly with a hammer, as you will smash the fragile locking mechanism.
Keep working row by row, sliding your planks under those door jambs you undercut earlier. If you hit a tricky corner or need to go around a floor vent, grab your tape measure, draw the shape onto your plank with a pencil, and use your jigsaw to cut out the obstacle.
The Final Row and Tricky Edges
You are in the home stretch, but the final row always requires a little bit of patience. Because houses are rarely built perfectly square, the gap left for your final row might be wider at one end of the room than the other.
You will likely need to “rip” these final boards, which means cutting them lengthwise to make them narrower. Measure the distance from the second-to-last row to the wall (don’t forget to subtract your 1/4-inch expansion gap) and cut your final planks accordingly.
Because you are right up against the wall, you will not have room to use your tapping block to click these final pieces in. This is where your heavy metal pull bar comes into play. Hook one end of the pull bar over the edge of the laminate plank, and tap the other end of the bar with your hammer. This pulls the final board snugly into the locking groove of the previous row.
If you encounter radiator pipes, measure exactly where the pipe will hit the board, drill a hole slightly larger than the pipe, cut the board in half directly through the center of that hole, and glue the two pieces together around the pipe.
The Finishing Touches
Your floor is entirely laid out! Take a moment to stretch your back and admire your handiwork. Now is the time to hide those ugly expansion gaps around the edges of the room.
First, walk around the perimeter and pull out every single plastic spacer you inserted against the walls. Next, install your baseboards or quarter-round molding.
Nail the molding directly into the wall or the existing baseboard—never nail it down into the floor itself. Remember, this is a floating floor. If you nail the molding into the floor, you pin the planks down, preventing them from expanding and buckling. The molding should hover just a millimeter above the floor, hiding the gap while allowing the wood to slide freely underneath.
If your new floor meets carpet or tile in another room, install a transition strip in the doorway to bridge the gap between the two different flooring heights smoothly. Finally, grab a microfiber mop and a laminate-approved cleaner, and wipe away all the dusty footprints.
Quick Troubleshooting Guide
Even the best DIYers run into hiccups. Here is a quick table to help you solve common mid-installation problems:
The Issue: The Quick Fix
Visible Gaps Between Planks: You aren’t pushing hard enough. Use your tapping block and a hammer to tap the groove edge until the gap completely disappears firmly.
Planks are buckling or bouncing. Your subfloor is likely uneven. If it’s a minor bounce, add a thicker underlayment patch. If it’s buckling wildly, check your walls to ensure you left a proper expansion gap.
The Clicks Feel Loose or Won’t Grab You might have debris in the groove, or you struck the board too hard and crushed the tongue. Clean out the groove, or toss the damaged board and grab a fresh one.
Common Mistakes to Avoid Like the Plague
When learning how to install Dream Home laminate flooring, knowing what not to do is just as important as knowing the right steps. Avoiding these classic beginner blunders will save you from tearing your hair out a year from now.
- Skipping the Acclimation Period: We mentioned it earlier, but it bears repeating. If you bring cold flooring from a warehouse and immediately install it in a warm house, it will warp, twist, and peel at the seams. Patience is your best friend. Wait the full 48 hours.
- Forgetting the Expansion Gaps: This is the number one reason DIY laminate floors fail. If you live in an area with distinct, changing seasons, your house experiences wild humidity swings. If you jam your flooring tight against the drywall, the summer humidity will cause the wood to expand, pushing against the wall until the floor physically erupts upward in the center of the room. Use your spacers!
- Poor Staggering Patterns: If your seams align perfectly across the room (often called “H-joints” or a “stair-step” pattern), your floor loses its structural integrity. The locks become weak, and the floor will eventually separate. Always ensure end joints are randomly staggered and at least 12 inches apart from the neighboring row.
- Ignoring Subfloor Moisture: Installing laminate over a damp concrete basement floor without a thick vapor barrier is a recipe for disaster. Moisture will slowly seep up, causing the bottom of the planks to rot, mold, and smell. Always test for moisture and use the proper underlayment.
Maintenance and Longevity Tips for Your New Floor
Congratulations! You have completed your DIY laminate flooring installation. Now, you want to make sure it looks brand new for decades to come.
Post-install care for Dream Home laminate flooring is wonderfully simple. The most important rule is to keep water away from the seams. While the top wear-layer is water-resistant, standing puddles can seep into the locking joints and cause the core to swell.
Sweep or vacuum the floor daily to remove abrasive dirt and sand, which acts like sandpaper under your shoes. When it is time to mop, use a lightly damp microfiber cloth with a specialized laminate cleaner. Never, ever use a high-heat steam mop. The intense steam will blast moisture directly into the seams, ruining your hard work in an instant.
If you accidentally drop something heavy and cause a minor scratch or chip, don’t panic. You can pick up a color-matched wax touch-up kit at the hardware store to seamlessly fill in the blemish. With basic, gentle care, a high-quality Dream Home laminate floor can last 15 to 25 years!
Cost Breakdown and Your Incredible ROI

Let’s talk about the absolute best part of this entire project: the money you just saved.
Hiring a professional contractor to install laminate flooring typically costs between $8 and $12 per square foot, including materials and labor.
By doing it yourself, you slash those numbers drastically. Your only costs are the raw materials and a few basic tools, bringing your DIY total to roughly $3 to $6 per square foot.
Let’s look at the numbers for an average 500-square-foot living room:
Expense Item Estimated DIY Cost
Dream Home Planks (550 sq ft with waste) $1,100
Tools, Underlayment, and Molding $400
Total DIY Investment $1,500
If a professional quoted you $10 a square foot for that same room, they would hand you a bill for $5,000. By following this guide, you have just kept $3,500 in your own bank account. That is an incredible Return on Investment (ROI) for a weekend of honest, rewarding physical work.
FAQ: How to Install Dream Home Laminate Flooring
What tools do I need?
You’ll need a saw, measuring tape, spacers, tapping block, underlayment, and safety gear.
Do I need to prepare the floor first?
Yes. Clean, dry, and level the subfloor before installation for best results.
Is underlayment required?
Yes, unless your planks already have it attached. It adds cushioning and moisture protection.
How do I start installing?
Begin along a wall, place spacers for a small expansion gap, and click the first row of planks together.
Do I need to leave gaps?
Yes, leave about ¼–⅜ inch around edges for expansion to prevent buckling.