
A sharp kitchen knife is one of the most essential tools in your home. It makes cooking safer, faster, and more enjoyable. However, we’ve all faced the frustration of working with a dull knife—it makes cutting tedious, increases the risk of accidents, and can ruin the presentation of your food.
But what happens when your Knife goes dull, and you don’t have a sharpener handy? You don’t need to worry because there are several practical DIY methods to restore your Knife’s edge using items you already have at home.
These methods are cost-effective, convenient, and quick, making them accessible to anyone. Whether it’s a ceramic mug, a leather belt, or even a car window, you’ll be surprised at how versatile everyday household items can be when it comes to knife sharpening.
Understanding Knife Sharpening Basics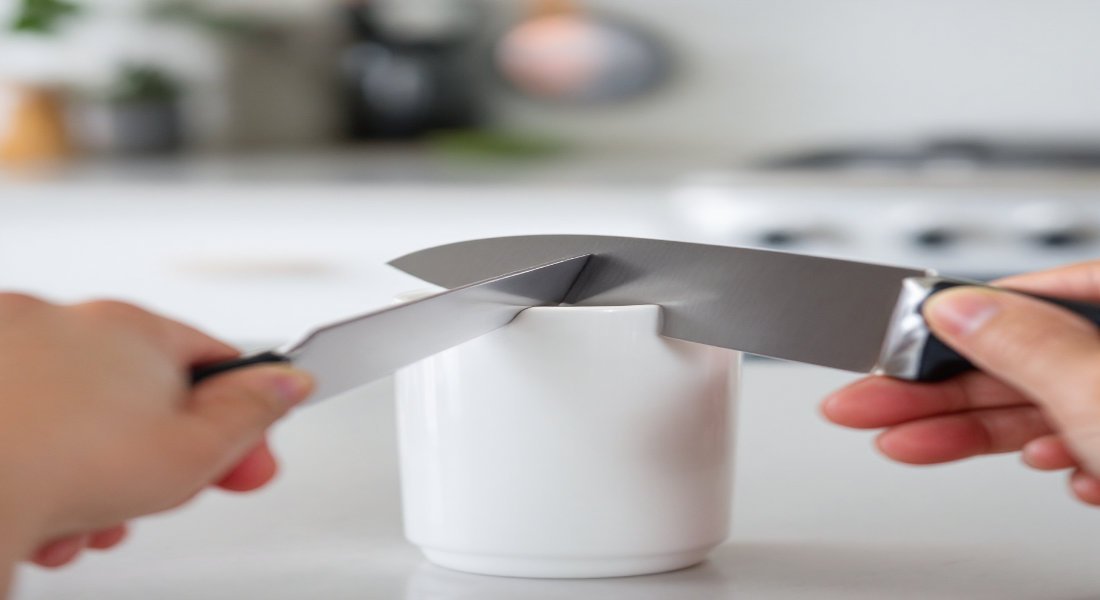
What Does Sharpening a Knife Mean?
Sharpening a knife involves removing small amounts of metal from the blade to create a fine, sharp edge. Over time, regular use dulls the Knife’s edge as it encounters resistance from cutting boards, food, and other materials. Sharpening restores the blade’s ability to cut effectively.
Sharpening vs. Honing
It’s easy to confuse sharpening with honing, but they’re fundamentally different.
- Sharpening removes metal from the blade to restore its sharp edge.
- Honing realigns the blade’s edge without removing much (if any) material.
Honing is like a quick tune-up while sharpening is a more intensive process that fixes a truly dull blade.
The Importance of a Consistent Angle
When sharpening, maintaining a consistent angle (usually 15-20 degrees) is critical. This angle determines the sharpness and strength of the blade. If the angle is inconsistent, the blade may end up uneven or duller than before.
Why a Sharp Knife is Safer
It may sound counterintuitive, but a sharp knife is actually safer than a dull one. With a sharp blade, you apply less pressure, which reduces the risk of slipping and cutting yourself. A dull knife, on the other hand, requires more force, increasing the likelihood of an accident.
Now that you know the essentials, let’s move on to the exciting part: sharpening your Knife using items you already have at home!
Household Items That Can Sharpen Your Knife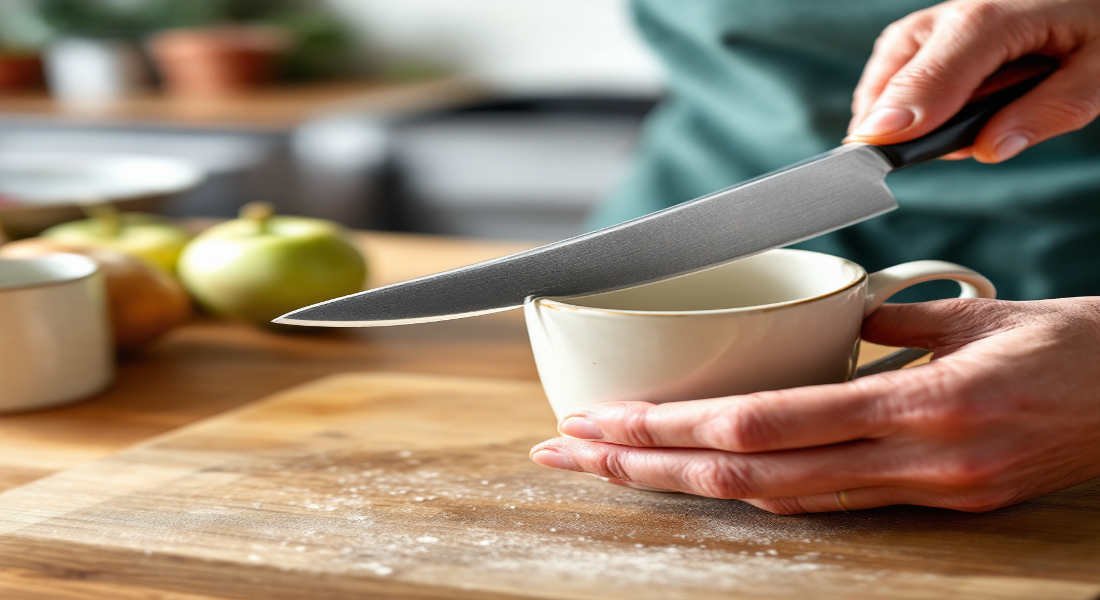
You don’t need fancy tools to sharpen your Knife. Here are several creative and effective methods using common household items.
Using a Coffee Mug or Ceramic Mug
The bottom of a ceramic mug has an unglazed, rough surface that works as a makeshift sharpening tool.
- Flip the Mug: Place the mug upside down on a stable surface. The unglazed ring at the bottom will act as the sharpening surface.
- Hold the Knife at an Angle: Maintain a 20-degree angle between the blade and the mug.
- Slide the Blade: Gently slide the blade across the rough surface, applying light pressure. Repeat evenly on both sides.
- Test the Sharpness: After a few passes, test the Knife by slicing through a piece of paper.
Advantages:
- Easy to find at home.
- Quick and effective.
Limitations:
- It may not work well for extremely dull knives.
- Requires a steady hand for best results.
Using a Leather Belt
A leather belt can serve as a strop, commonly used for final polishing or sharpening.
- Choose the Rough Side: Use the rough, unfinished side of the belt.
- Hold the Knife Properly: Maintain a 15-20 degree angle and slide the blade away from you along the belt.
- Alternate Sides: Repeat the process on both sides of the blade.
Best Practices:
- Ensure the belt is firmly secured or held in place.
- Use gentle, controlled strokes.
Advantages:
- Perfect for finishing and polishing.
- Easily accessible.
Limitations:
- Works best as a final step, not for heavy sharpening.
Using a Smooth Stone or Flat Rock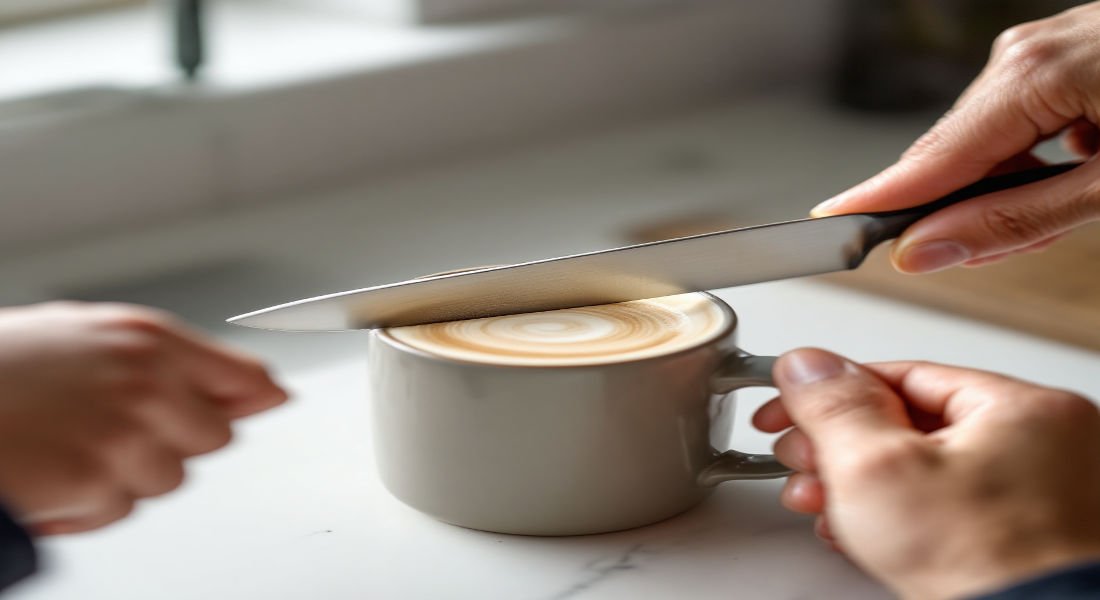
If you have access to a smooth, slightly abrasive stone, it can serve as an excellent sharpening tool.
- Find the Right Stone: Look for a flat, smooth stone with some abrasive texture.
- Wet the Stone: Add a little water to reduce friction and enhance sharpening.
- Sharpen the Knife: Hold the Knife at a consistent angle and slide it across the Stone. Use even pressure and alternate sides.
Advantages:
- Great for outdoor or emergency situations.
- Provides a thorough sharpening.
Limitations:
- Requires practice to maintain the right angle.
- It is not ideal for indoor use without preparation.
Using a Nail File or Emery Board
Nail files or emery boards are surprisingly effective for knife sharpening due to their coarse surface.
- Place the File on a Surface: Lay the nail file flat on a table.
- Slide the Blade: Hold the Knife at a 10-20 degree angle and slide it along the File.
- Alternate Sides: Repeat the process equally on both sides.
You may also read (understanding femas role in home inspections).
Advantages:
- Small and portable.
- Great for minor touch-ups.
Limitations:
- Not suitable for very dull knives.
- Files may wear out quickly.
Using a Car Window or Broken Glass Edge
The rough edge of a car window or broken glass can act as a honing surface.
- Roll Down the Window: Roll the car window halfway down to expose the rough edge.
- Sharpen the Knife: Slide the blade along the edge at an angle, alternating sides.
Safety Warning: Be extremely cautious when using this method to avoid injury.
Advantages:
- Convenient if you’re outside or on the go.
- Works well for honing.
Limitations:
- Not suitable for heavy sharpening.
- Safety risks involved.
Other Creative Methods
Here are a few more unconventional ways to sharpen a knife:
- Aluminum Foil: Fold the foil several times and slice through it repeatedly.
- Sandpaper: Use fine-grit sandpaper to sharpen the blade.
- Shovel Blade: The rough edge of a shovel can act as a sharpening surface.
Always exercise caution with these methods and test the sharpness gradually.
Tips for Sharpening Without a Sharpener
To ensure the best results, keep these tips in mind:
- Consistency is Key: Maintain a steady angle throughout the process.
- Test Safely: Check sharpness by slicing paper or soft vegetables.
- Clean and Dry: Wipe the Knife clean after sharpening to remove metal particles.
- Safety First: Protect your fingers, use stable surfaces, and avoid excessive force.
If your Knife still doesn’t meet your expectations, consider professional sharpening as an option.
Common Mistakes to Avoid When Sharpening at Home
To get the best results, avoid these common mistakes:
- Incorrect Angles: Sharpening at inconsistent angles can damage the blade.
- Excessive Pressure: Pushing too hard can chip the blade.
- Wrong Surfaces: Using overly rough or unsuitable materials can dull the Knife further.
- Skipping Safety Precautions: Always prioritize safety to prevent injuries.
- Over-Sharpening: Too much sharpening can weaken the blade over time.
You may also read (a guide to selecting snake sizes for home drain).